The chainplate conundrum for the Hans Christian 33 has always been on my mind since first looking at HC33. After discovering this building method of the 33, I pondered as to why they would build such a stout boat, but skimped out on the chainplate design. I wasn’t alive or even a thought of back in 1982 but maybe builders/designers where not as aware of crevice corrosion back then as we are now. I know many other boats shared this building technique including Island Packet yachts up to the mid 90’s. The more I walked around the boat yard in Guaymas, MX and the more I talked to other owners, the more I found out many late 70 and 80’s boats share this similarity. What is boggling is almost all of the owners of the vessels are having nightmares of doing this project. Luckily for us, our boat is traditional enough to pull off the external chainplate look. Our neighbors on a Hylas 44 are not so lucky, also the chainplates are located much further inboard. On the HC33 the chainplates exit the cap rail, thus rigging angles/length should not have to be changed if you do a good job.
Step one: Choose a material:

I pondered what type of material to use for the actual plates for a long time. After getting a quote for Port Townsend Bronze Foundry, I thought I could make 6 plates for less than $1800. Looking back now, $1800 would have not been a bad deal for 6 custom forged chainplates with the bends and holes already made. If I where to have done this project in the states, I would have gone this route because unless you own a fabrication shop, the price of labor to make your own would probably put you in the same ball park, at least in California. Not to say you cant do it, but coming from a guy that attempts to do everything himself, I was very hesitant. After a long look I decided to go for 3/8’’ C954 aluminum bronze bar from onlinemetals.com. This stuff is as strong as stainless and has very good corrosion resistance. I needed enough material for 6 24’’ plates, 4 being 2’’ wide and 2 being 3.5’’ wide. I bought the bronze before we left the states and stored them in my bilge. I knew we would eventually have the boat in some foreign country that would have a machine shop right down the street and the boat would be on the hard to work on.
The dissimilar metal was thought about and after research and asking people that are working with aluminum bronze, I was told not to worry for this application. C954 Is being used in marine applications where high stress and ultimate strength is needed. All these applications are using S/S screws. I can also attest to after a full year of cruising, there is no sign of any corrosion due to dissimilar metals. Bronze and stainless have been used together for some time now and most of the fittings on the HC33 that are bronze are held in place with S/S fasteners.

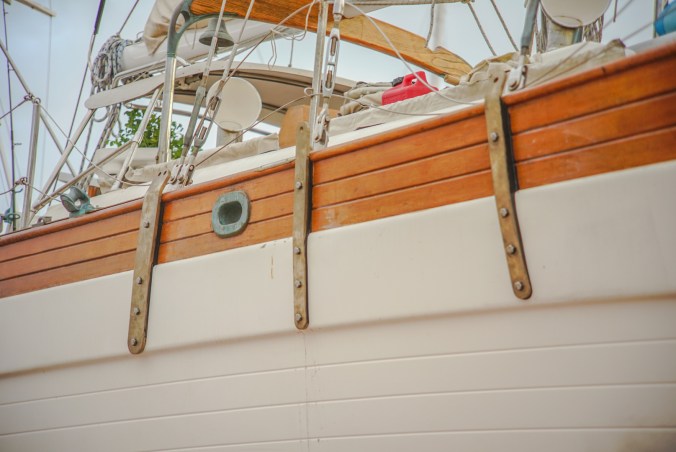
This is what the double chainplate turned out like after all the steps listed below
Step two: Choosing Fasteners:

Ideally I wanted bronze fasteners to go along with my plates, but after doing some pricing, it was going to cost nearly $700 for the 48 1/2’’ fasteners I wanted. So I opted for the US made S/S 316 1/2×20 bolts with lock washers and nuts. Grand total $100. I didn’t know what lengths I needed so I bought long. I bought a bag of 25 5’’ bolts thinking I could always cut them down. Sadly when you get to 5’’ I could only get partial thread. This made me a little worried, especially because I knew getting stainless fasteners in Mexico can be hard, 316 nearly impossible. Thoughts about this now; buy fasteners as you go, I got to use my 5’’ bolts for the top hole that goes through the bulwark, but ended up sourcing locally 304 bolts, the further down the plate the shorter the bolts become. On our boat the Bolt lengths stayed the same despite the plate: Top Bolt #1: 5’’ Cut down for perfect fit. Bolt #2: 3.5” cut down for fit. Bolt #3,4: 2.5’’ not needing to be cut.
I would strongly recommend not using my bolt lengths for your own boat, all of these boats are different, and most places carry 1/2’’ 304 Fasteners.
Step Three: The right tools for the job:

Drillbits: The Hc33 existing chainplates are not 1/4’’ but not 3/8’’ somewhere in the middle. I also knew that there is a supporting horizontal piece of bar in the lay up so when they where laying the hull all the plates would stay put. Needless to say I was going to be chomping through some heavy metal 24 times, I was going to need some quality cutting gear. After bouncing this idea off a couple of machine shop friends I have, they steered me in the right direction. I opted for the 135º split tip heavy-duty bits. I ordered them for mcmastercarr and with 4 17/64 bits, one 5/8’; bit and 2 pilot bits my grand total was $130 including shipping. Knowing what I know now, have a grinder close and youtube how to quickly sharpen large bits. It’s quite simple and works like a charm. Really you only need 2 bits if you are willing to sharpen them. Even with my 4 bits I needed to sharpen them twice before finishing. I Found 1/4’’ bit make the best pilot holes. Using a water spray bottle to keep things cool is paramount. DO NOT USE OIL! If you do this you will impregnate the surrounding fiberglass with it and sealant will not work or last as long.
Drill:
You will need a corded drill with a low-speed option. It will also need an oversized chuck to fit the 17/64’’ bits. I used a cheap harbor freight drill and it worked fine.
Die Grinder:
If you don’t already own one, buy one now. This is basically a giant dremel tool. Mine is made by haborfrieght, but there are many companies that make them. It has a 1/4’’ chuck, buy a set of S/S bits off of amazon for about $50-$80. This is not only a good tool for this job, but it has so many more uses. Trust me, buy one.
Angle Grinder:
You’ll need one to polish out the chainplates if you go with the same metal I went with. The Bronze comes straight from the forger so there is forging marks in them. With a Sanding pad, start with 40 grit, work to 120, then 220. I then used an orbital sander with 220, then 320. Make sure to wear a respirator for this job. Bronze dust is no joke. Do this all after you drill the holes and make the bends.
If you decided you are going to do the holes in the plates and the bends yourself you will need:
Drill Press:
Might as well, it will make holes clean and straight. Plus with the clamping feature if the bit sticks, it wont hurt you. Go slow while drilling, super slow. Any size will work as long as the chuck is big enough for the bits.
Hydraulic press:
Harbor Freight sells them, they don’t cost much and some come with bits for bending. You might be able to the bends in a large vice, but the press will do it easier and you can go slowly so you don’t over bend.
Oxy- acetylene:
This is to heat for the bends, Heat until orange. MAP gas could do this, but will take much, much longer. You can rent the outfits from local welding shops.
Step Four: Construction of the Plates:

While driving around in Guaymas I spotted a machine shop very close to where our boat was hauled. We walked in and luckily a man there spoke pretty good english. With the metal in hand and marked where I wanted all the holes and where I wanted the bends. I got the quote of 2000 Pesos ($125 US).


We dropped off the plates and I was told to come back when they bend them to make sure they did it right, I prefer this actually. Upon returning our plates had been drilled and the ends had been machined*. Here came the fun part, bending this thick metal. They ushered me to the back where stood a big hydraulic press. With some slight adjusting it was ready. A quick conversation to the welder that was working on another job gave us a welded angle iron piece which would be our bit for the bend. I asked before we started bending if we where going to hot bend the pieces. They said they didn’t think it was necessary for the 5 degree centers but would probably end up doing it on the 30 and 35 degree bends. The pressure began to build as we attempted our first plate, more and more and more until BANG! We all jumped. I went in, the plate was fine but upon inspection of our newly welded angle iron bit was flat as a pancake.

Another conversation with the welder pursued. This time we got a much thicker angle iron piece and we are off to the races. Pressure up bent to 10 degrees accounting for the bend back to be around 5. PERFECT! All six went through this process. Now came the hard part, the 35 degree forward lowers. I asked again about hot bending but they where confident we could do it without heating feeling they had got the hang of it with the 5 degree bends. Up came the pressure, 5 degrees, 10.. 15… 20…. 25…..30……… BANG!!! This time the whole room rang out. We all thought we broke another bit but this time the bit was fine, the chainplate snapped! Well shit, I thought it was game over but Antonio said no problem, he handed it to the welder and showed him the issue. The welder nodded and brought me with him. he hammered the piece that was still connected with about 1/4’’ of non cracked bronze to the desired 35 degrees, grinded out the crack then grabbed some bronze welding rod and tig welded the seam up. With some grinding I had a whole chain plate again! Now that we figured out you cannot cold bend that much they grabbed the oxy-acetylene and began to heat the other lower forward. This time the metal bent like butter. We continued to use this method and all the bend went very straight forward. After that we shook hands, I gave them $2200 ($138.00 US) with a tip of apparition and drove back to the boat.
*Note. When making the rear lower double plate, make sure you give enough space between each hole so the toggles can fit next to each other. I made the tops of the plates too rounded thus putting the holes too close to each other. Not a massive deal but I had to trim a little metal off the bottom and sides of the toggles on this plate.


Step Five: Drilling the holes on the boat:

As mentioned above, knowing how to sharpen you own bits will save you hours. It is easy, all you are doing is sharpening the edge. They might not look as pretty, but they cut fast and you’ll thank me later. Only after drilling the first 8 holes did I learn this trick of sharpening your own bits. The last 4 through metal took less than 10 minutes a piece. Drilling metal like this is unlike anything I had ever done before. I didn’t occur to me until I started drilling the first hole that I had never drilled metal upright. Generally when you drill metal you are above it, with gravity helping you out, this is an entirely different game. I also put a line tied from the aft cleat to the samsonpost. This line was my bridle that I put behind my butt so I didn’t fall off the scaffolding and it gave me extra support to push inwards.


I marked the first hole, always the top hole that penetrates the bulwark. With this hole and only this hole, there is something special. In exactly the center of the bulwark, centered with the internal chainplate at least on Prism there was a 1/4-20 flat head machine screw that penetrates the laminate and chainplate. This 1/4’’ screw is a curse and a blessing. For my first hole I simply used a drill bit and started chucking away at the wood until I found metal. I immediately hit the top of this screw once through the wood. Not knowing this I thought I had already hit the main chainplate, so I drilled on, chewing fiberglass and metal at the same time. Looking at these shaving I thought something didn’t look quite right so I Inspected the hole, being about a half-inch in now I could see I had hit what I thought was a S/S stud. Well this made my life hell because anyone that has broken off a screw or drill bit into a projects knows, your drill bit always wants to round off and go into the softer material around the stud. Needless to say, not knowing this was a screw I slowly drilled the SOB out. Once I got to the actual chainplate I could see that it was actually a screw. Knowing this now, every top hole I started with the die grinder with its round bit, slowly cutting in until I found the top of the screw. Cleaning out the head with a metal pick, using the proper sized screwdriver every screw came out with out much hassle. The blessing in this whole mess is that with the screw out, you now had a pre-drilled pilot hole!


After I had the top hole drilled I placed the chain plate, and hand tightened the bolt affixing it to the side of the hull. Now get off the scaffolding and step back. For the Fore and aft plates you need to angle the plates so they pull straight on the rigging. With the plates affixed by only the top bolt move the bottom until you are satisfied. Mark the lower hole. I marked the entire perimeter of the plate with pencil to make sure I was staying strait. I then Drilled the #4 hole, there is no metal here so it drilled fast and easy. Now bolt #4 in place, your chainplate is now fixed in place. Working up to hole #3 is just glass as well, hole #2 is very thick with lots of metal. Doing the drilling in this manner lets you use the chainplate as a drilling jig. This way all of the holes will line up no matter what.
What took me three full days to do should take you much less now knowing these tips about the drilling.


Step Six: Inside trim and bolt access:

Getting to the back of the plates has always been a big worry when I set out to do this job, but truly, it is the most simple part. Four of the Six plates where very straight forward. Using a hole cutter the same size as my large fender washers, in my case 1 1/2’’. In the hole cutter I replaced the 1/4’’ pilot bit with a 1/2’’ bit that has a 1/4’’ tapered down shaft. These are available pretty much everywhere. Using this combo, from the inside I would place the hole cutter pilot bit in the hole that was already there, and slowly cut into the inside trim until I hit glass. Remove the hole cutter and use a small screwdriver to pop out the piece of wood.


The piece is usually held in place by a bonding agent that was used to keep the trim secured to the hull, you may need to use a hammer and flat head and take out the wood in pieces. At this point use a socket and put on the fender washer, lock washer and nut, done. All that needs to be done now is make a teak cover plate for the holes.
Now the other two plates that are not like this are a bit more of a pain. Your boat may not have the exact placement of plates as Prism so you may not run into this. The Port cap shroud and the starboard forward lower chainplates sit right on bulkheads. In our case with our angling, the starboard lower for the most part is accessible from the cubby in the nav nation area. Only the top #2 hole was viewable from the inside, while the other holes (#3-4) where completely sealed off in the bulkhead. This is where the die-grinder came into play again. I slowly took out wood on the #2 hole until I got to glass, then removed more wood around the hole so the washer could sit flush against the glass. Using a measuring tape I went down the appropriate distance and ground in to find holes #3&4. In my case to remove enough wood and space for the fender washer I ended up completely puncturing the bulkhead, be aware of this because the opposite side is tabbed to the hull with heavy fiberglass matt. Again, this was not very hard to do, but you really need a die grinder and the appropriate bits to make this job easy and doable.


On the port side the cap shroud is not behind a bulkhead, but instead nested very close to one, so close I could not fit in my hole cutter. Out came the $10 harbor freight multi tool (similar to the fein tool) With a narrow cutting bit I was able to take out the trim. All of this is concealed behind the teak cover plate for the wires in this corner. It should be mentioned when you are initially drilling the holes, to remove this cover plate so you don’t damage it. Also, go slow not to hit any wires.

That is all there is to it, I have the wood selected but have yet to make the teak cover plates for the inside, but they should be fairly straight forward. Some people might consider moving the plates in order to not have to deal with the bulkhead obstruction. I would not recommend this unless you have done the math and you are willing to put large backing plates behind the chainplates new position. The whole idea behind this job is that you are using the strength of the impregnated plate as your backing plate. Although the HC33 hull is super thick (1/2”-5/8’) at this part of the top sides and could probably support the rig and bolts without a proper backing plate, that is not up to me to decide or figure out.

Step Seven: Bulwark Spacer Plates:

One of the last steps to do is to make spacer plates for the bulwarks. Between the fiberglass and the cap rail there will be a void which the #1 bolt intersects. It is up to you to make a tight fitting plug for this void. I ended up using a red mahogany because thats what I had on the boat in that size and thickness. Teak, purple heart, any oily hard wood will work. If you are feeling really fancy G10 will do, but In my opinion an over kill and not worth the mess. I used a jigsaw and got the basic shape, then with a belt sander clamped to my work table, I shaped the spacer. You want a slightly large fit on the thickness, and I mean slightly, to let some compression space to be permittable
Fore-warning, this took 2 days to complete and a lot of up and downs on the ladder doing the fine fitting. Every plate needed a custom spacer, each one needed a fine tuning, again and again. Once you have the spacer made, secure the plate by holes #2-4 with the spacer in place and drill the center hole for bolt #1.
Step Eight: Fill the voids:
At his point you are close, the last thing I did was to fill the holes with thickened epoxy… WHAT!?! you filled the holes!?! Let me tell you why. The hole in the bulwark for bolt #1 is the most important hole because it takes all the pressure of any miss alignment of the rig and straitens it out. It is the only bolt that should see any side load, thus you have to be very certain it is happy and will stay in place. Some of you may or may not know that the bulwark on the HC33 his hollow. And when you drill hole #1 you will see an air void on the inboard side. You can’t simply thru-bolt and tighten because you will be tightening against unsupported fiberglass. Now there are three ways of dealing with this. You can use the technique I used previously for the inside teak trim and cut out a larger hole in the inboard side of the bulwark, thus requiring some kind of plug to seal it up. I thought long and hard about this, and if you have the time and money this may be the best route because you will have a very finished look without bolt ends showing. You could have them made of bronze and it would look very yachty. Option two is similar, hole cut a larger hole and then fiberglass/seal in place a carbon or fiberglass hollow rod. Cut this rod so it has a flat but does not a protruding lip. This is my least favorite option, mainly because I think it will be the hardest to keep the area looking nice and clean. Maybe if you are planning on repainting the boat at the same time you could make this option look good. Option three is what I did. Tape the perimeters of all the holes with masking tape, clean the holes with acetone then mix up a some 404 or 406 west systems or their equivalents to a thick non runny consistency and fill all the holes except for hole #4. This may require two people but continue pressing the epoxy in from both sides with little mixing sticks, until you feel really good about getting the epoxy in there. Once dry use the 220 sanding pad on the grinder and sand flat the out sides of the hull where the epoxy is proud. Remove the tape and put the chainplate back in place securing them with bolt #4 while holding the top in place. Now with a 1/2’’ bit, drill out hole #1 then put a bolt into it. Using a 1/2’’ bit vs the slightly larger 17/64 that you used earlier, thus making a very precise fit. With bolt #1 in, continue using the 1/2″ bit to drill out #2, bolt it into place then do the same with #3. At this point, remove the bolts and chainplate and do the same epoxy process for the #4 holes. With bolts #1-3 in place, drill #4 with the 1/2’’ bit and you are now ready to seal the plate on. The reason for this process is so all the holes will have an exact fit, with bolt to fiberglass contact on the entire bolt. This also cures any voids in the laminate and most importantly the large void in hole #1. WS 404 filler has a compression strength of over 8,500 PSI, this is ample for this application.
***It is important to note that if at any time you have any water oozing out of a hole, (which you might if you had bulges like we had on Prism), you must let the holes completely dry before doing this step. You can help the drying process by flushing the hole with rubbing alcohol or acetone. This will help evaporate the moisture while also cleaning out the hole. West systems epoxy does not cure well if moisture is present, so do not rush this part.
Step Nine: Seal it up:

The last part is pretty standard, I chose to use Teak Deck Systems SIS-440 caulking. I like this stuff because it made to last, it stays elastic and does a really good job keeping the water out. I also had a bunch left over after doing Prism’s decks in Washington and the stuff only lasts so long. To make you life easier, dry fit the chainplate one more time, and tape the perimeter of the plate on the boat. Use wider tape, it will make clean up and the job much easier. I have learned that paper towels are your friend, cheap ones do just fine, use little pieces instead of the entire towel. Wipe once and rip, throw away, repeat. If you wipe more than once you will just smear the sealant. Each paper towel should give you 20-30 wipes. I have found this to be most effective. If you use TDS, make sure to pull the tape as soon as you are done. TDS is a sealer not an adhesive, if you wait too long you may pull your entire bead along with the tape.
Congratulations your boat now has external chainplates!!!
Step 10: Move the rigging over and have a beer:

Depressurize the cap shrouds first and move them to their new plates. Tighten then move the remaining shrouds. Do a rig tune, crack a beer and be merry!
Cheers!
Jon

10 thoughts on “Adding External Chainplates to a Hans Christian 33t”
Awesome article Jon and much appreciated!!
Well done! I think they look more classic with externals. Make sure you clean carefully and and wax heavily below them so the verdigris weeping as it develops doesn’t stain the hull (I think that’s why they went internal). You also forgot to mention offsetting the Clevis pin holes a bit. There’s a table in Skenes, and also in the riggers apprentice by Toss with the specs, you can find it at the link below.
http://www.cruisersforum.com/gallery/showimage.php?i=1325&original=1&c=500
Hey Rob, get chart! didn’t have that when I did this but I copied the same thickness of the offset as the original. With the added strength by going to 3/8” Aluminum bronze I thought this would be overly cautious. We like the way they look as well!
Jon,
Great article with lots of good advice. Question, though, won’t the use of dissimilar metals on the bolts and plates prompt corrosion? My captain on the sport fisher swore against dissimilar metals. He said electrons pass between them until the charges equal and the conduction causes rust. On a good note the hullside chain plates add a nice antique feel to Prism. When you and Shannon next find yourself at a clothing store pick up some white poet shirts and colorful bandanas. You’ll be Pirate Prism then. 😉 My SV Zoso is on the hard in the yard until I finish some schooling. The invitation to dinner still stands if you find yourself in Texas. Two rounds of the best tequila to start. Fair winds, my friends.
The dissimilar metal was thought about and after research and asking people that working with aluminum bronze, I was told not to worry for this application. C954 Is being used in marine applications where high stress and ultimate strength is needed. All these applications are using S/S screws. I can also attest to after a full year of cruising, these is no sign of any corrosion due to dissimilar metals. Bronze and stainless have been used together for some time now and most of the fittings on the HC33 that are bronze are held in place with S/S fasteners.
Maybe with some rat lines we could start a Pirates of the Caribbean charter once we are to the BVIs!
Cheers,
Jon
Thanks for the detailed write up. Always inspired by you two!
Just read your final entry on your blog about the engine install, awesome blog!! Best one so far, great job Shannon!! The new engine bay looks great!! Also I added a 52 flexible tank (because of all the space there was once you remove the water heater ) bellow the bed in the aft berth! So now we have over 200 gallons of water. We are making our plans to move into Gitana permanently at the end of the year but we have lots of projects to do before we start cruising. Our list is long and expensive lol!! When do you guys think you will be in Puerto Rico ( roughly of course)
Any way just wanted to say hi and see how you guys are doing, also I have a diesel leak coming from the rear of the engine, any ideas?
Cheers Andy
Sent from my iPhone
>
The edge distance looks too small on the chainplate with two turnbuckles. They look good, but if it fails, two times the diameter of the clevis pin would be better if it will fit.
Great job. How did you determine what angle for the bends? looking at doing the same to a different make of boat.
Thanks!
We sighted the rigging when the mast was still up.